Show Posts

This section allows you to view all posts made by this member. Note that you can only see posts made in areas you currently have access to.


Topics - EIEIO

Pages: 1 2 [3] 4 5 ... 11
31
Brag Forum / Wedding couple
« on: May 23, 2014, 05:40:19 pm »
These two younguns will be married in June. We've know Crystal since 6th grade science fair. The portrait is 8"x10", 1/4" BB Ply. Frame is cut from 1" Birch. The backing is 2mm dark brown foam sheet the covered over with 1/8" BB Ply. The back strips are 1/8" red oak. The corner splines are 1/8" Black Walnut.

32
Brag Forum / Curvy Spoon
« on: May 18, 2014, 04:28:07 pm »
Here's another wooden spoon, this one with some curves in the shape. 10" long, 2" wide bowl.


The body and bowl are cut from Walnut. The bottom of the bowl is a glued-on piece of 1/8" BB Ply to get some color contrast.

The compound cutting pattern is attached. It's meant for a 1" blank but you can use 3/4" if that's what you've got. You could soften the inside angle where the handle meets the bowl - this one is sharp and hard to sand and get oil into. Finished in Feed N Wax.

33
General Scroll Saw Talk / Sanding belts
« on: May 15, 2014, 06:57:52 am »
I am low on belts for my Porter-Cable belt sander - 4"x36". The local woodworking shop had that size belts but wanted $6.99 each. They had boxes of (10) 4x24" for $20.

On-line, Peachtree Woodworking sells 4x36" at (5) for $10 ($2 ea).

Why such a big difference? Any thoughts?

34
Brag Forum / Bowl-cut wooden spoon
« on: April 28, 2014, 10:04:15 am »
Seems a little slow on the Forum just now, so here's a new design that was easy to make and turned out pretty good.


This is a wooden spoon that was cut like a scroll saw bowl. It is cut from 1" Birch hardwood from a 1"x2"x10" blank. The inside of the bowl is cut out, glued to the back of the bowl area, then trimmed down to 1/8" thick and sanded smooth.

The attached PDF shows the instructions and the basic shape, but these spoons are usually carved with a hatchet and knife and have more curvy lines and decorative touches, especially in the handle. So start with the basic pattern, but experiment with curves, shapes, decorations, etc.

The spoon shown has a bowl size of 2 tablespoons.

35
General Scroll Saw Talk / Bandsaw Fence for Craftsman 14"
« on: April 15, 2014, 08:46:24 am »
I should have asked here first, but I got carried away and placed the order. I got a Craftsman 14" bandsaw earlier this year which I am happy with but has no fence. I have done some resawing by clamping a 2x4 to the table, but I wanted to try a real fence. The Jet fence had terrible reviews from a lot of reviewers, but the Kreg KMS7200 with KMS7214 resaw guide looked pretty good.


Can anyone out there comment on this fence? Is there any issue mounting it on the Craftsman table saw?

If no response, I'll post something when it arrives (2 days).

36
Brag Forum / Change Bowl
« on: April 10, 2014, 10:44:07 pm »
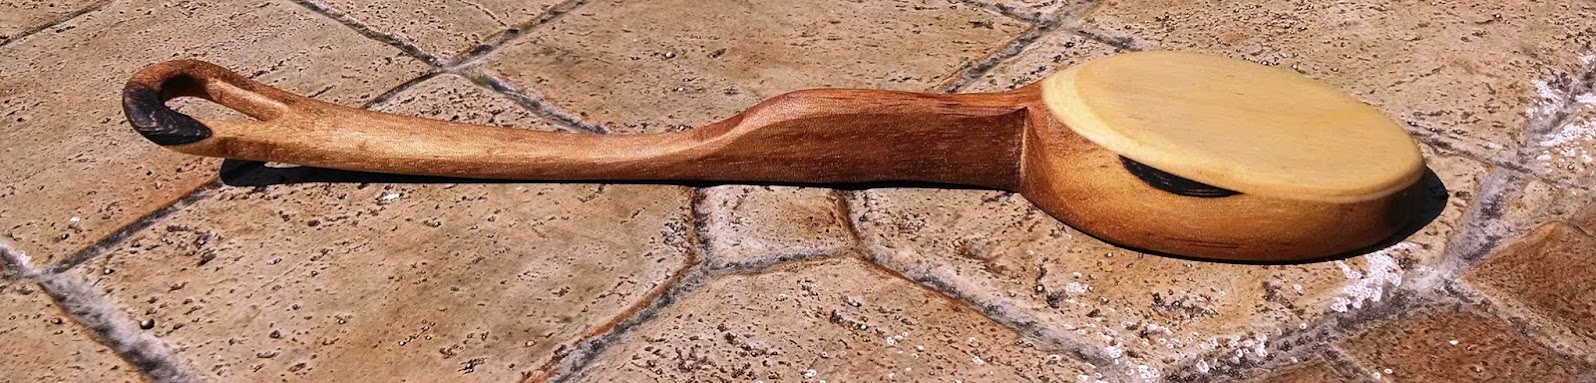
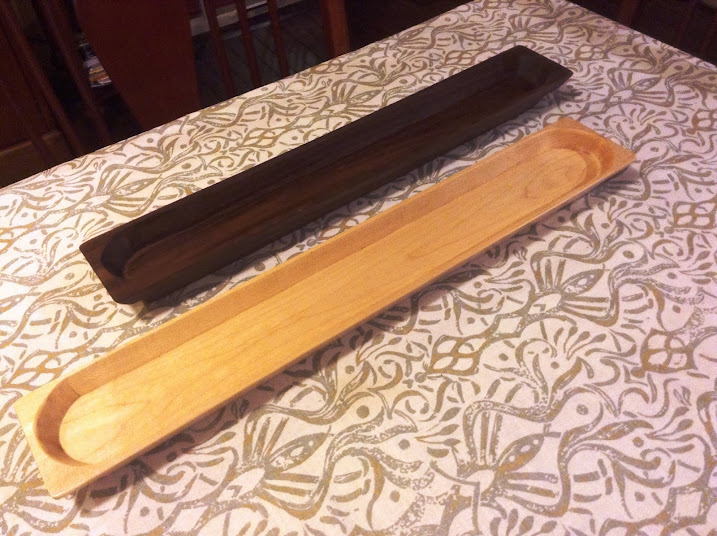
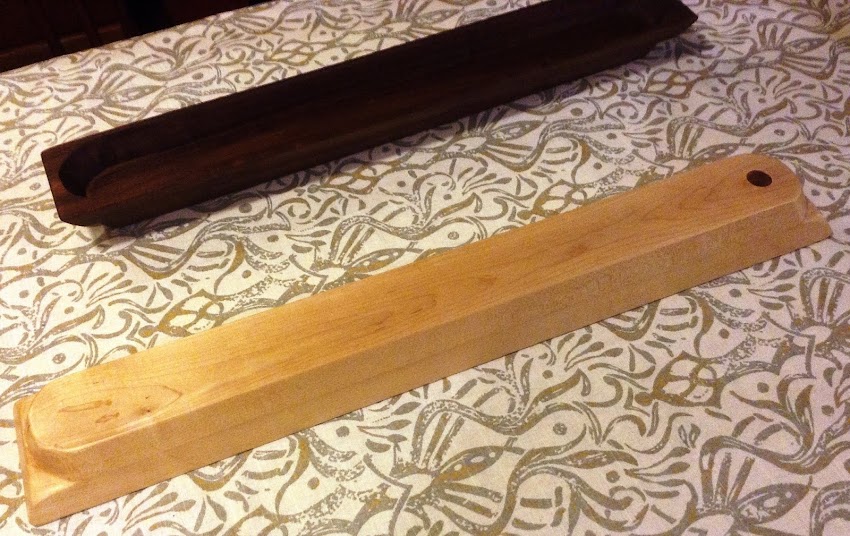
Nothing too fancy, but a nice unique-looking piece. This was a scrap of 1" thick Red Oak left over from cutting an oval picture frame. Bowl is 11" long, 3.5" wide. The back surface is flat to sit against a back splash, back board on your dresser, etc. The front and sides are smooth curved.

The bowl was made by cutting the outer ring 1/4" thick with a 2 degree angle using a #5 blade. Use a 1/16" bit and drill vertically (not at the 2 deg angle) just inside of the cut line. The inner section could then drop down about 1/4" into the ring. The center was removed then resawn on a bandsaw to 1/2" thick, and the lower piece glued and forced back tight into the ring. The pilot hole winds up at the bottom edge of the ring, which is covered by the center, and in the top end of the center, which was cut off in the resaw, so no need to patch it. The center protrudes about 1/4" from the bottom of the outer ring. Round the sharp edges with a belt sander then finished with Howard's Feed-n-Wax.

This can be done with about any odd shaped piece of hardwood that you don't want to waste.

For the next one I may use a steeper angle - maybe 30 degrees - to make it easier to scoop change out, but that will need to be pilot-drilled at a little less than the cut angle so it is hidden. Then resaw the center to split off the bottom 1/4" (rather than 1/2" on this one) to glue back in.


37
Brag Forum / Black Walnut Basket
« on: March 31, 2014, 06:25:18 pm »
A customer ordered five of these 10" baskets in Black Walnut. He wanted a heavier wall, so these are 0.25" thick rings. I got a 10.5" wide board from a local sawmill, about 12' long ($10.50), that will be more than enough for this set. The walnut had been drying in his barn for some years and looked pretty washed out. It was cut from off-center of the log so the heartwood is mixed with sapwood. I was a little concerned that the color might not come back. Shows how much I know.

The basket is finished with Howard's Butcher Block Conditioner, basically a food safe mineral oil mixed with bee and carnuba wax. It came up so dark that it looks like it was burned with a torch. The sapwood veining really sets it off.

The second photo is the basket bottom showing my new brand. The wood is so dark that the brand is a little hard to read in the photo, but it shows up pretty well in person. I have been looking for 2014 pennies (or any 2014 US coin) to embed in the bottom but have not been able to locate any yet.


38
Brag Forum / Sawyers' Day 2014 - What I got
« on: March 04, 2014, 08:53:33 am »
Marg suggested I start a thread to capture photos of our Sawyers' Day exchanges so they stay in one place. As you receive a piece, please take a picture and add a post to this thread. We are still 2 weeks out from March 19 so it will be a while before they show up.

39
Brag Forum / Filigree Crosses
« on: February 26, 2014, 02:37:03 pm »
These are the Filigree Cross designs that Sheila was kind enough to post last Easter - that time's coming up again. They are scaled up to 5" wide and cut from 1" thick birch using several FDUR#5 blades (this wood is really hard). The stand is a bent piece of 3/32" welding wire stuck into a 2"x2.5"x1" birch base. Finished with Feed n Wax. They are headed to this weekend's Mardi Gras Silent Auction at our parish.
   

40
General Scroll Saw Talk / Celebrate Sawyers' Day March 19 2014
« on: February 20, 2014, 11:51:55 pm »
Late last year we talked about creating a holiday of our own to celebrate our great hobby. It was suggested that it be called Sawyers' Day in honor of the 19th century artisans that spent the day in a pit pulling on one end of a big saw, and that it be held on March 19th, the feast day of St. Joseph, patron saint of carpenters and fathers.

That's a month off now. I'm still in. I suggest we handle it like our Christmas exchange but instead of tree ornaments, we exchange something we made related to woodworking - use your imagination but keep it small enough to mail.

Anyone that's interested can send me an email (RMHayes@RMHayes.US) with subject "Sawyers' Day" and in the body of the email put
    Your Real Name
    Your forum name
    Your mailing address
I'll select a partner and return it to your email ASAP. We don't have that much time so be quick if you want in. I hope a lot of you do.

If you don't use email, send me a PM with the same info and I'll return your partner by PM.

Happy Sawyers' Day!

41
Tutorials, Techniques and Tips / Stinking pop-ups and tool bars!
« on: January 30, 2014, 11:38:02 am »
I've spent the morning scrubbing my two laptops to get back to normal. Maybe this can save someone a few minutes.

In your browser, there may be extensions that have been loaded, or under Control Panel Programs there could be added programs on your computer. These skunks sneak into your quiet world when you download something from the Internet, even from reputable suppliers if you do not go to the trouble of making a custom installation. They cause those dumb double-green underlines or nuisance pop-up as you try to browse.

Extensions can be disabled or trash-canned. I'd trash can them unless you are clear about what they do. For example, Norton adds a security extension that I leave active.

Invading programs require going to Control Panel/Add Remove (WinXP), Programs and Features (Win7) or similar (depending on your version of Windows). You can sort by installation date. Look for anything recent (within the last month). There may be some valid programs that you intentionally installed, with this unwanted crap installed on the same date. In Win7, right click and Uninstall.

There can certainly be stuff deeper hidden than can be simply uninstalled, so make sure to keep your security software current. I use Norton and have been very happy with it.

42
The Coffee Shop / Baguette Board Does Double Duty as Pretzel Pram
« on: January 28, 2014, 06:37:55 pm »
Beef and Barley soup tonight
Hot Pretzels on the side.
Fifty days to go till Spring -
Thank God for Winter being outside.

It's nice to make something that looks good, but to me the ultimate is when something you made gets used on a daily basis. The wife brings out this Baguette Board about every night with bread, desert, or something else good to eat.

43
Brag Forum / Business card holder
« on: January 26, 2014, 10:57:32 am »
This is a modification of a box I'd made some time ago. The box is a piece of 1x4 pine cut to inside and outside wall rings, with 1/4" ply on top and bottom (this is not BB Ply - note the different color of the center material - but it works fine for the box skin). The top card holder is cut from solid birch using Steve's business card box pattern:
http://www.stevedgood.com/businesscardbox.pdf.
Finished with Howard's Feed n Wax. Simple but effective.
A bit of experimentation - rather than PVA wood glue I tried Titebond Instant Bond - a CA glue for wood - to attach the top pieces. Hold for 5 seconds and it bonds, handle in 7 seconds, full cure in 8 hours. We'll see how it holds up on a piece that gets touched a lot.
http://www.titebond.com/instant_bond.aspx
 

44
Ask Steve a question. / Airbrush for shellac?
« on: January 02, 2014, 09:28:28 am »
Has anyone tried using an airbrush to apply shellac?
  • Need to thin the shellac?
  • Internal or External mix airbrush? Singe or Double acting?
  • Pressure setting?
  • How to apply shellac?
  • How to clean the tools after use?

I'd think a thinly spayed shellac might dry faster than a brushed application but have not tried it yet.

Any help out there?

45
Brag Forum / Baguette Boards
« on: December 26, 2013, 08:09:50 pm »
These are Baguette Boards, meant to hold a long, skinny loaf of French Bread. Black Walnut is 24" long, 3.5" wide; Maple is 26" long, 4" wide. They were made like a 1-ring bowl with a 30 degree angle cut. Just the inside oval cut was made - the outside was left rectangular. After sanding the inside and gluing on the bottom, a table saw was used to trim the outside to a 30 degree angle. To me, that makes it look like a continuous side wall, as if the bowl was gouged rather than assembled. They were given 2 coats of shellac, then paste waxed with 0000 steel wool.

I've seen some of these with cuts through the walls to guide a knife, but I think the bowl shape will hold the crumbs better.

The penny is a 2013, to mark the year (Thanks Triple-B - that's a nice touch). 


Pages: 1 2 [3] 4 5 ... 11

SMF

Teknoromi