Show Posts

This section allows you to view all posts made by this member. Note that you can only see posts made in areas you currently have access to.


Topics - Rapid Roger

Pages: [1] 2 3 4
1
General Scroll Saw Talk / Steves' guitar pattern...
« on: February 13, 2017, 10:51:09 am »
I wasn't sure were to make this post...PATTERNS ? BRAG ? or some place else...so, I'll just put it here and hope it inspires others to try things.
I really liked Steve's pattern of the guitar idea this morning. It reminded me of one I made several years ago.
Steve has made guitar patterns in the past and they gave me inspiration to try and add to his patterns myself.
I made this one for a Christmas present for my son who was a guitar player in a band at the time. (It was Christmas 2010) And it might give other people ideas to expand their own work.


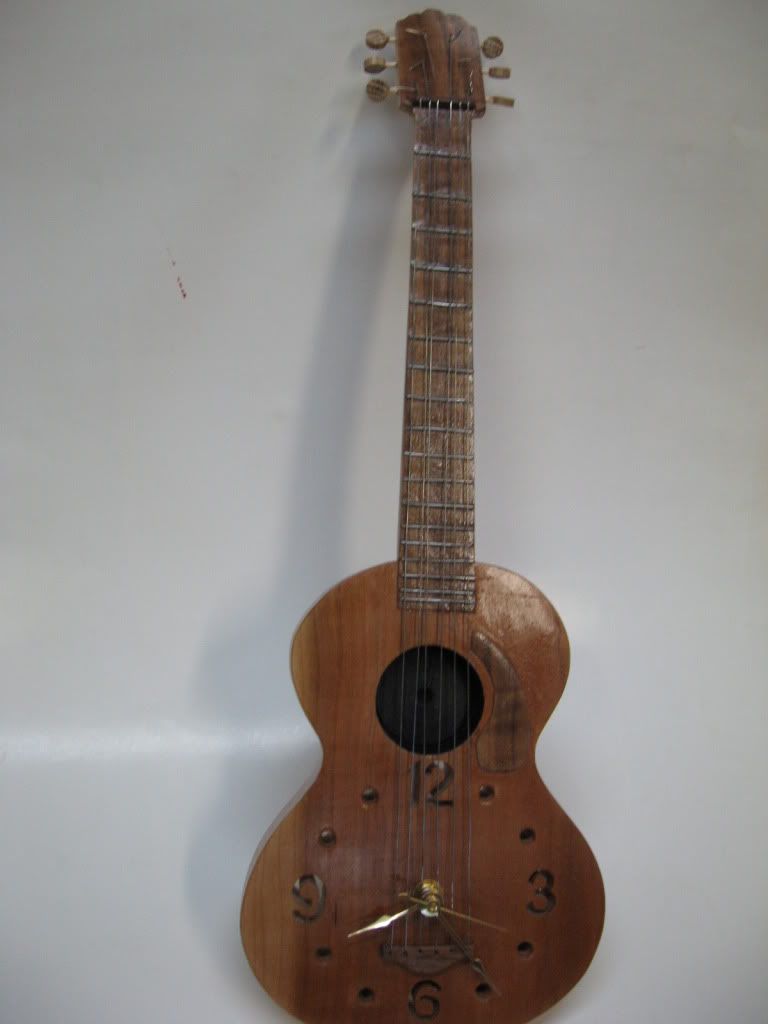
The body is solid cherry with a clock works imbedded in the back side and the numbers cut into it and holes drilled @ 1, 2, 4, 5, 7, 8, 10, 11. I used a forester bit (drilled part way through) for the sound hole  The strings are thin (safety) wire and the tuners are pieces of tooth picks with round pieces glued on. And the frets are small pieces of wire imbedded into the neck. I glued a mounting block at the top of the neck for hanging it on a nail in the wall.

I don't have anything against patterns as such, and for someone just starting out, they are a necessity. But, I like to see "One off" things that people come up with and it really isn't too hard to do. Just take some time, two or three patterns of a subject, and use the things that you like about each one. AND DO YOUR OWN THING! :)

Rog
 

2
The Coffee Shop / Black Friday
« on: November 26, 2016, 11:59:34 am »
I saved a lot of money this "Black Friday".....I didn't buy a darn thing. :)

3
General Scroll Saw Talk / Steve Goods email on finishes.
« on: April 16, 2016, 12:30:26 pm »
I was very happy to see Steve Goods email this morning.
He covers a subject and offers an answer to a question that is often asked here in the forums.
"What finish is food safe?"
I have tried to answer this question several times but, let's face it I am not a scientist or carry any weight for people to trust me...And rightfully so.
All finishes sold in the US are food safe once cured. And I would bet that even if that were not so, I don't think anyone child or adult could ingest enough from chewing on a wooden item to do any serious harm to them. My gosh people have been drinking lead tainted water form their faucets for years!
It is just another case of someone somewhere started a scare tactic and it grew all out of proportion and instilled fear in people.
When I was a child in the '40s I slept in a baby bed that was more than likely painted with lead paint and I more than likely chewed on the top rail of that bed just like everyone else did. Most of us lived through that era for several years afterword and seem to be fairly OK.
I think the final answer to the question is SHELLAC. They use shellac to coat candy and medicine pills for gosh sakes!
Now on to the real problem....
FAST FOOD OF ALL KINDS!  lol

4
The Coffee Shop / Steves "Plumber" pattern Jan 20th
« on: January 20, 2016, 11:37:42 am »
I saw the new pattern that Steve Good posted in email and just had a FIT!
Steve please review that pattern and use a PIPE WRENCH on it instead of a CRESCENT WRENCH! Plumbers seldom use crescent wrenches but, they always have pipe wrenches! 
Just joking a bit, I'm not at all upset. I just saw the pattern and made that observation first thing. :)

Rog

5
Toy Makers / Gear Toy
« on: October 04, 2015, 06:23:24 pm »
OK guys and gals,
I posted a picture of a gear toy that I made several years ago and "A" request was made for me to show greater detail of it.  :o
I wasn't sure where to post it (patterns?) (tutorials?) (general?) but, IT IS A TOY so what better place to show it than here?  ;)
First, let me say that this ISN'T my pattern but, I did find out where I found it!  :) (your not going to believe this) It is a free pattern so, I feel OK with posting it (or where for you can find it.)  ;)
It is in a WOOD magazine from November 2012 issue 215! (I told you it had been a few years)  ;D
You may have to do some research to find the magazine though. Try friends that have been in woodworking for awhile or, the library or, write or call the magazine to see if you can get a back issue from November 2012.
Anyway, here goes another long winded "How I Did It" from Rog with pictures of course!
You are suppose to use 1/2" MDF according to the mag but, I used plywood of course. I also made more gears than you need to but, I over do everything (and I was making two of them)


Each gear needs a "gear base" but, only one "crank handle" per set.

And of course some peg board for the backer. Use peg board with 1/4"holes and 1" spacing and a frame is not required but, it makes things nicer, more finished and easier to handle especially if you make the frame tall enough to cover with the gears in place.


A bit of finish on the gears (I recommend shellac for food safety reasons. Smaller people like to put things in their mouth you know.)
and you are good to go!  ;D

I notice by the pictures that it took me 8 days from start to finish  :P but, as I said, I was making two of them and I made a few more gears than necessary.
You just install the crank handle on top of one of the gears (your choice), make sure the cogs are interlocked with each gear and turn it and watch "SPINNING JOY" as each one turns in the opposite direction. And be sure to look at the face of the kid when he turns it!  ;D ;D ;D

Hope that helped. Now get started by finding the Wood magazine, copy the full sized patterns and make some saw dust and a kid happy!


Rog

PS I gave my grandsons theirs on Christmas 2012 and they are now 8 and 13 and still have the "Gear Set" in their play rooms and mess with them now and then.  8)


6
Brag Forum / Christmas gifts
« on: September 01, 2015, 03:48:22 pm »
I don't often post in the brag section and, I'm not really bragging right now except that I GOT THE CHRISTMAS GIFTS FOR THE GRANDKIDS DONE ALLREADY!  ;D
A few weeks ago, Steve posted a pattern for a cordless reading lamp and I had just started to think about Christmas gifts SOOO, the  trains did meet this time!  ;D
I have 5 grandchildren (male and female) between the ages of 7 and 15 and they are all in school and have some reading to do from time to time and I'm sure could use a reading lamp in their rooms.
I made a few slight changes to the pattern that Steve posted (as I always do with other people's patterns) and it was a fairly simple, straight forward pattern but, making SIX of them got a bit boring and labor intensive with all the sanding.
Since the LED lights come in packages of three, it only made sense to go ahead and make six lamps. (I could always use one for myself  ;) )
I used my signature "Old Growth Plywood" again!  ::)


Y'all better get crackin, Santa time is only FOUR MONTHS AWAY!  ;D ;D ;D ;D ;D

Rog

7
The Coffee Shop / Speeding ticket
« on: April 09, 2015, 11:19:01 am »
A police officer pulled over a car for speeding.
As he approached the female driver, she said "I didn't think you gave tickets to good looking girls." He replied "We don't! Sign here please."

Rog

8
The Coffee Shop / Mixed emotions
« on: April 03, 2015, 09:35:58 pm »
Ever wonder what the definition of "mixed emotions" was?

Watching your mother-in-law driving your new BMW over a cliff seems to be close.

Rog  ;D

9
Tutorials, Techniques and Tips / Making your own font
« on: December 28, 2014, 02:45:27 pm »
Some times it is kind of neat to make your own font. Yes you can draw! Pick up a pencil and paper and just try to sketch out something that might look cool! OK then, try again, it is going to work out eventually ....


I made these boxes several years ago. The Sullivan box went to my brother and the Chandly box is owned by the widow of my good friend.

Rog

10
Tutorials, Techniques and Tips / Yet another picture frame
« on: November 21, 2014, 12:32:58 pm »
I'm posting this because it is another style frame that might be of use to scrollers.

Sometimes when you have a thicker cutting, like 1/2" or 3/4" thick it is hard to make a frame for it. Most people will just glue strips of wood to the sides and call it good but, of course I have a bit more difficult yet more finished way of doing it.
A friend came in with an oil painting and wanted a frame for it. As you may know the canvas is stretched over a wooden frame on an oil painting so it is a bit more difficult than framing a thin photo or 1/8" scroll saw project because of the thickness.
As it turned out, the painting would look fairly good in a rougher, rustic looking frame, and who is better at sloppy wood working than me?  :)

The painting was about 5/8" to 3/4"thick and measured 12' x 16". I had a stick of 1" x 1-1/2" fir 8 foot long which actually measured 13/16" x 1-5/8 so that should work!  ;)
First, I cut the stick into two pieces 19" and two pieces 15" long intentionally using a hand saw for the "rough" look. I'm not a good hand saw cutter and really didn't want a nice square smooth cut anyway.  ;)


Next I went back to the power tools, the router table in this case, and cut a stopped grove into the side of each piece. It is 1/4" deep and 1" wide and just over 16" long  (or 12" long on the short pieces).


I squared up the rounded corners left by the router bit with hand chisels.


I didn't realize until after the fact that this was a totally unnecessary step!  :P ::) The half lap joint notches removed all of my hand work.  :'(


I measured, marked and cut the notches for the half lap on the table saw by nibbling out the waste and checking for fit as I went. Remembering that notches on the short side are cut on the bottom edge and the long side notches are cut on the top (or front) side all went well. However the reverse probably would have looked better.  ??? Hind sight is a wonderful thing.  ;)


Next, it was just a matter of glue-up. It is just straight forward put on the glue, slide the notches together and it comes out almost perfectly square BUT, I check it for sure anyway.  ;D Oh! and make sure it fits the oil painting before glue-up too!  ;D ;D


Now, slap on a bunch of stain and we are GOOD TO GO! You can beat it up with a piece of chain  or a hammer or what ever if you have a sick mind like mine.


It is a nice, rustic but, very strong frame and NO miters or splines to mess with.  8)

Hope this might help someone some time.

Rog


11
Brag Forum / Another bowl
« on: November 16, 2014, 05:24:35 pm »
A few weeks ago DWSudekum posted a small bowl using solid wood and plywood.
I really liked the idea and just had to try it.
Mine isn't nearly as nice as his but, IT'S BIGGER!  ;D ;D

I used cherry and plywood to make it. It measures 8" x 12" and is 3-1/4" tall.
I call mine a candy bowl....I really LIKE candy. ;)


Thanks for the inspiration DW!  8)

Rog

12
Tutorials, Techniques and Tips / Making a picture frame
« on: October 28, 2014, 07:05:50 pm »
Well, as I mentioned in a previous post, I made a picture frame today and took plenty of pictures detailing how "I" do it. So I decided to try another tutorial and hope that I have better luck this time.
I used a stick of old barn wood that measured 3/4" x 2" x 48" and made a frame for an eight by 10 picture. I realize that most people on this site want frames for scroll work so, I made the dado inside the frame 1/2" deep so it could hold a cutting on 1/4" plywood and a 1/4" thick backer. The outside of the frame measures almost 12" x 14" and I know the first question will be "But Rog, how can you cut two 14" pieces and two 12" pieces out of only a 48" long board? That adds up to 52"! ". Well, it can be done, it is all in how you cut the board as you will see in the pictures.


Note that I am using a miter sled and using only the LEFT side and then flip the board over for each cut thereby over lapping each miter by  two inches. Actually all four pieces are cut too long for the final frame at this point and will be cut to final length later using the RIGHT side of the miter sled and the miters will fit exactly.

Here are all four pieces rough cut and the scrap from the 48" board.


Next is cutting the dado's for holding the picture (or insert) in the frame. I made mine 1/4" wide and 1/2" deep just by adjusting the blade height and the fence for each cut. This would be much easier using a dado blade (which I do own) in the saw or a router bit on the router table but, I just got lazy about changing the saw blade and wanted to show how it can be done without all the fancy stuff that a lot of people don't have.


Now you can cut each piece to final length using the RIGHT side of the miter sled. Measure the final length of each side by measuring inside the corner of the dado and transferring the lines to the out side of the board for the cut. I wanted to make sure that the frame would fit an 8" x 10" picture so, I made my measurements 8-1/8" and 10-1/8" so there would be a bit extra room.


Make VERY SURE that the top and bottom rails are EXACTLY the same length and both sides are EXACTLY the same. The usual problem of making sure the miter angles will fit was taken care of with the miter sled already.

Now for the glue-up....I have a jig that does a very good job keeping everything square and flat and can glue all four corners at once. Still, I highly recommend "cross measuring across the diagonal corners" for insurance.
Note that my jig only requires ONE clamp! 


Now that the glue-up has dried for about two hours, we can take it out of the clamps and make the splines. Being careful about handling and/or dropping the frame. End grain gluing is NOT very strong anyway and being mitered corners does not help. That is why we are putting splines in the corners. These splines are made for STRENGTH and not beauty as most are so I'll put them on the back and more or less out of sight. You will be able to see them if you look, on the edges but, WHO LOOKS AT THE EDGES OF A PICTURE FRAME!?!  ;D
The groves for the splines can be cut using a dado blade in the table saw or could be chiseled out but, I cheated and used the router table. Well, it was already set up with a 3/4" straight bit and all I had to do was adjust the depth a few times so who could blame me?  ;)
I made the groves 3/4" wide and 3/8"deep.


Grab a piece of scrap and make the splines...3/4" x 3/8" and glue short pieces into the groves.


Once the glue had dried and you trim off the excess spline material, WE ARE DONE!  ;D

Since my frame was barn wood, I had just a bit of sanding to do and stained the "new" wood edges with a vinegar/steel wool stain I made, and
then beat the frame up a bit with a chain, hammer and knife.  :o


Add a picture or scroll cutting and hang it on the wall!


This picture was taken by our daughter back in 1985 when she was only 10 or 12 years old and I have always loved it.

I hope this tute might help someone and give some ideas on how to make one type of picture frame.

Rog

13
Tutorials, Techniques and Tips / Picture frame book part 5
« on: October 17, 2014, 11:24:44 pm »
As a reminder, here is my finished picture frame book .


Hope you enjoyed my tutorial. I just wish I could have done it all in one post or at least have it in numerical order. :) For your reading pleasure.
If you have any questions, feel free to ask and I'll try to make up some sort of an answer.  ;D ;D ;D ;D

Rog
Rog

14
Tutorials, Techniques and Tips / Picture frame book part 4
« on: October 17, 2014, 11:05:36 pm »
As for the magnets, I buy them at Lowe's (or any home/hardware store) and they come in packages of ten and are fairly inexpensive.
They are the "Push Pin"style magnets that people use to post notes or pictures on their refrigerators. They look like the push pins that are used on cork bulletin boards with the plastic knobs on them but, if you crack off the plastic using a vice or pliers, there is a little 3/16" diameter x 3/16" long magnet that is fairly strong. JUST PERFECT  for this application.
I use an old pocket knife and a small mallet to install the magnet in the 3/16" holes. If there is concern about them falling out (like maybe the hole is a bit too large  ::)) you can put a drop of superglue or epoxy in the hole to keep them in place.


As for the cover, it is pretty straight forward. Just cut two pieces of thin wood about 1/4" larger than the book and glue it on.
I used door skin material but again, any wood can be used including plywood. I recommend that it be no thicker than 1/16" especially the two pieces for the spine.  Which brings to mind....After cutting two strips of cover material the exact thickness of  one half of the book for the spine, you will need to notch out for the hinge barrels and sand an angle (or taper) on the center edges so that the book will open properly. The angle will have to be 45 degrees or better so that the book will open to at least 90 degrees or more.
As for the inlay on the front  cover.........That is a subject for another tutorial....and is entirely up to you. You can put lettering on it as I did on one of mine or a picture like a heart or anything. Heck, I left the covers on two of my books blank!  ;D ;D


Rog


15
Tutorials, Techniques and Tips / Picture frame book part 3
« on: October 17, 2014, 10:17:15 pm »
Now it gets a bit more difficult.
I used 1/4" thick oak for my frame and cut an oval opening in the center. You can use any kind of wood, even plywood, JUST BE SURE IT IS AT  LEAST ONE QUARTER INCH THICK or greater!  You can cut an oval, a circle, a square or any shape out of your frame. just cut the outside of the frame about 1/16" smaller than the center section of the book that you cut out before. AND make sure you leave some "meat" in the corners for magnet holes.
The critical part of the frame is that we are going to drill a 3/16" hole 3/16" deep in the back of the frame for magnets so it must have about 1/16" of wood to hide the magnets.


I was making four books at a time so I made a pattern for cutting eight ovals all the same (or close enough  ;D). And the small scrap of 1/4" plywood was a gauge for locating the magnet holes from the outside edge of the frame and the screw holes for the inside of the book cutout.
I used a 3/16" BRAD POINT drill bit because it leaves a fairly flat bottom in the hole for the magnets. AND WE DO NOT want to drill all the way through the frame. By the way, the 3/16" hole just inside the oval is the starter hole for the scroll saw so, IT IS drilled all the way through.  ;)

Now go back to the book.....Using the 1/4" scrap/gauge mark for holes and drill for the screws using a countersink style drill bit. I used #8 screws 1/2" long.  Again do not drill the screw holes all the way through. However, the cover will hide those holes if you should slip up a bit.  :)


Next, I will answer your question....."Where do you get your 3/16" magnets?" and we do the cover of the book.

Rog

Pages: [1] 2 3 4

SMF

Teknoromi