Author Topic: First attempt portrait pattern  (Read 3628 times)

k9Dave

  • Guest
First attempt portrait pattern
« on: January 05, 2014, 09:55:30 am »
Hi All,

Looking for some advice. I want to progress to cutting portraits and want to use a head and shoulder shot of my granddaughter. To this end I have used Photoshop CS6 and as suggested by another member I used "Filter - Sketch - Stamp" and then the adjustments in an effort to produce a suitable portrait with enough detail.
I have attached a copy of the original and my attempt at reproducing it. To my eye I don't think there is enough detail in the reproduction to produce a suitable likeness.
I would appreciate any pointers you could give me.
Feel free to use the original image in order to make comparisons.

Thanks in anticipation - Dave


Offline EIEIO

  • *****
  • Hero Member
  • Posts: 2147
  • Be Prepared.
    • View Profile
    • RMHayes, LLC
Re: First attempt portrait pattern
« Reply #1 on: January 05, 2014, 10:09:38 am »
Dave - here's my pass using GIMP and Inkscape. This was a fast job (<10 minutes) so I did not try to simplify the hair, but it should be cuttable. I also attached my process for using these programs. Ask if you have any questions.
EX-21 arrived 2-1-2013!
Porter-Cable PCB370SS in the corner
Lancaster Ohio
Ray Hayes - RMHayes@RMHayes.US
www.RMHayes.US

k9Dave

  • Guest
Re: First attempt portrait pattern
« Reply #2 on: January 05, 2014, 11:41:48 am »
EIEIO,

Thats amazing thanks, just the effect I was looking for. I will post the results once completed.
Thanks again - Dave

Offline EIEIO

  • *****
  • Hero Member
  • Posts: 2147
  • Be Prepared.
    • View Profile
    • RMHayes, LLC
Re: First attempt portrait pattern
« Reply #3 on: January 05, 2014, 01:17:50 pm »
Dave - as I said, this was a quick rendering. You should go over it looking for weak sections, peninsulas, and unneeded details. I checked for floaters and there were none, but there still may be places to make it easier to cut. You should keep full detail in the eyes, but can probably remove a lot of detail in the hair.

Here's one I cleaned up a bit - you can see some bridges added around the outside edges - and a Fill & Stroke version from Inkscape. I'll watch for your posting after cutting.

EX-21 arrived 2-1-2013!
Porter-Cable PCB370SS in the corner
Lancaster Ohio
Ray Hayes - RMHayes@RMHayes.US
www.RMHayes.US

Offline Joleet

  • ****
  • Sr. Member
  • Posts: 410
    • View Profile
Re: First attempt portrait pattern
« Reply #4 on: January 05, 2014, 06:02:26 pm »
Dave....I read your post and I too use photoshop...Thought I would give the girl a try.  Instead of using stamp, I would try photograph and go from there,  I too use inkscape to clean it up. I also take advantage of layers for more darkness or detail.  Nice pattern Ray....
Ron

Ron... Twin Falls, Idaho

Me Slow?  I get up in the morning with nothing to do and go to bed at night with half of it done!

Offline frankorona

  • *****
  • Hero Member
  • Posts: 4030
  • Frankorona (Frank) (Crown)
    • View Profile
    • Frankorona?s workshop
Re: First attempt portrait pattern
« Reply #5 on: January 06, 2014, 09:40:50 am »
Pretty patterns, thank you all for your help

k9Dave

  • Guest
Re: First attempt portrait pattern
« Reply #6 on: January 06, 2014, 12:02:47 pm »
Thank you for the response. Thinking ahead regarding finishing, I'm of a mind to stain and polish but I am in two minds as to whether I should do this before I cut or after, bearing in mind there will lots of minute cuts that could be damaged if the finish was put on after. I will be using 1/4" BB ply.
As for the backing, I was thinking of using 1/8" ply covering it with satin black paint.
Your thoughts would be much appreciated.

Dave

Offline EIEIO

  • *****
  • Hero Member
  • Posts: 2147
  • Be Prepared.
    • View Profile
    • RMHayes, LLC
Re: First attempt portrait pattern
« Reply #7 on: January 06, 2014, 12:16:59 pm »
You can finish it after cutting. 1/4" BB Ply is tough stuff. But don't put on the backer until the portrait has been finished.

To finish BB Ply I like to use shellac+wax. Shellac dries in about an hour so it's not hard to do 2 or more coats. I usually let a coat dry then sand lightly with 0000 steel wool. The last shellac coat gets sanded with 0000 steel wool, with Johnson's Paste Wax in the steel wool. The finish feels like satin. The shellac has a slight orange tint so it gives the BB Ply some color.

If you plan to frame it, you should size the BB Ply blank to fit a standard frame - 5x7, 8x10, etc. If you make your own frame, use contrasting wood, and use the same shellac+wax finish. I like to leave the glass out so people can feel the cutting, but that's an option.

1/8" BB Ply makes a good backer. I like a wooden backer for unframed portraits. When I do a portrait that will be in a frame I use this foam stuff from Hobby Lobby called "Silly Winks Foam Sheet". It comes in 2mm and 3mm thickness, 12"x18", in several colors. $0.89/sheet. The black is very flat black. Inside a frame, you can leave it loose behind the cutting so someone could change it to another color if they wanted to. Black felt also works and looks nice. I've been told that black cardstock will fade with age in sunlight.
EX-21 arrived 2-1-2013!
Porter-Cable PCB370SS in the corner
Lancaster Ohio
Ray Hayes - RMHayes@RMHayes.US
www.RMHayes.US

Offline spirithorse

  • *****
  • Hero Member
  • Posts: 923
    • View Profile
Re: First attempt portrait pattern
« Reply #8 on: January 06, 2014, 02:41:21 pm »
Great patterns and great info given to help out.
Thanks for helping the members of the forum.

Dave, one other suggestion I can give you in regards to making your own patterns is to experiment
with the program you are using. For example, take your photo that you have already started with
and look at the difference you get if you use the steps you have taken with the image size set at
72 dpi  and then take the same steps with the image size set at 300 dpi.
Probably quite a noticible change. Furthermore, begin changing the contrast settings to see if you can make the image more to your liking.
I definitely cannot make any improvements to the patterns already given to you! Ray and Joleet have done great jobs and much faster than I could!
God Bless! Spirithorse

Offline Danny

  • *****
  • Hero Member
  • Posts: 1671
    • View Profile
Re: First attempt portrait pattern
« Reply #9 on: January 06, 2014, 02:48:30 pm »
Spirithorse you beat me....  Ray and Joleet did a Great job on Designing that Beautiful looking little Girl.  Wow!  Makes me want to cut her.  So Sweet looking.  Danny  :+}
Danny  :+}

Offline wombatie

  • *****
  • Hero Member
  • Posts: 5557
  • Victoria Australia
    • View Profile
Re: First attempt portrait pattern
« Reply #10 on: January 06, 2014, 11:54:48 pm »
Both are great patterns, well done guys.

Marg
MARG

No one notices what I do until I'm not here to do it............

k9Dave

  • Guest
Re: First attempt portrait pattern
« Reply #11 on: January 07, 2014, 03:05:34 pm »
Hi All,

Just a quick update to say that I have started the cut and so far so good. In-between I have had another attempt at a pattern of my grandson using Inkscape using EIEIO's tutorial. I have attached an image of what I have managed so far.
I intend to cut the whole image out of the blank and set it on a black background. I wonder if you could cast a critical eye over it for me and point out anything I have missed? I think there might be a problem with the upper teeth and lip line I can't seem to fathom a way of keeping the lip line without the teeth falling out (I have personal experience of that  :D )
As usual any tips would be greatly appreciated.

Dave

Offline EIEIO

  • *****
  • Hero Member
  • Posts: 2147
  • Be Prepared.
    • View Profile
    • RMHayes, LLC
Re: First attempt portrait pattern
« Reply #12 on: January 08, 2014, 11:01:03 am »
Here's some feedback - note it is all my opinion so take it or not.

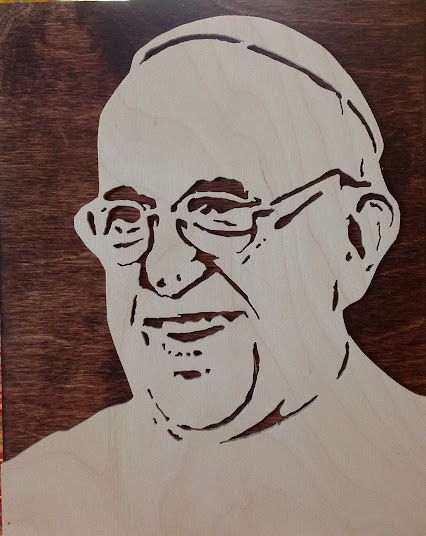
You did a good job with the line breaks in his shirt - they provide support bridges, but still look like continuous lines. Very nice.

I usually do not try to show the lines between teeth - they tend to look unnatural. Just letting the teeth run together, or maybe some slight bumps at the gum line where the teeth touch, usually looks better.

The eyes look good if they are cuttable - can't see from this image. Eyes are the 1st thing you see in a portrait.

I see you went after the hair treatment. Good job. Hair is always tricky. I usually leave it as produced by the process even though it looks on paper like a head full of slugs. But it is not something a person looks at first in a portrait so the slugs just serve to set the tone of the hair, especially with boys (girls use hair as a major feature and it needs to look right).   

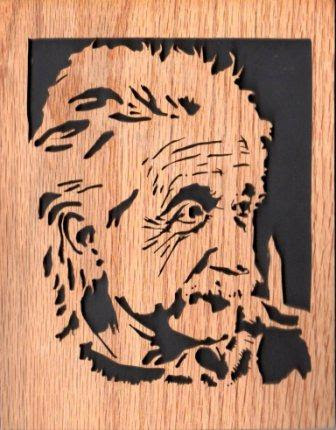
I like the cut-out images with large black background but usually not 180 degrees around the head - I think they look better with 360 degrees around just the face, or 90 degrees around a profile. Steve Good's "Einstein" is a great example of a 90 degree profile - 3/4 image with the face outlined by background but the back of the head merged into the border (I always try for a 3/4 portrait when possible - it seems to render better and is more recognizable). With the 180 degree background I think you will need a frame to define the portrait. Or you might leave a 1/2" wide border around the black background.

I like to add some text to the cutting - maybe a child's name or nick name - to help people recognize who it is. As good as a portrait looks, a lot of people might nit be able to recognize who it is (maybe dyslexic? always surprises me but it happens)

I also tend to concentrate on the face and eliminate below the neck as much as possible.
EX-21 arrived 2-1-2013!
Porter-Cable PCB370SS in the corner
Lancaster Ohio
Ray Hayes - RMHayes@RMHayes.US
www.RMHayes.US

k9Dave

  • Guest
Re: First attempt portrait pattern
« Reply #13 on: January 08, 2014, 12:05:25 pm »
Hi,

Thanks for the feedback it made a lot of sense. I was hoping to show you my efforts with the pattern you supplied of my granddaughter. I finished cutting it today but had not reckoned on the law of sod being present when I lifted the pattern off the wood. In doing so some of the veneer came away with the paper  :'( :'( Unfortunately it does not appear to be repairable. Other than that I was really impressed with the outcome.
I have read on the forum somewhere that a better option may be stacking the blank between 2 cheap off cuts of ply so I will try that tomorrow I guess i'm learning from my mistakes.
Once again thanks for your help and I promise I will stop bothering you soon  ;)

Offline EIEIO

  • *****
  • Hero Member
  • Posts: 2147
  • Be Prepared.
    • View Profile
    • RMHayes, LLC
Re: First attempt portrait pattern
« Reply #14 on: January 08, 2014, 06:48:53 pm »
No bother at all. Sorry to hear of the problems with removing your pattern.

If you use Baltic Birch plywood, it should not tear when removing the pattern.
If you spray-glued the pattern to the blank w/o packing tape, wipe it with mineral spirits or paint thinner to soften the glue.
If you put packing tape over it, use a heat gun to soften the glue. If you don't have one, you can microwave it for 30-60 sec to soften it. It will peal right off. When the pattern is off, use mineral spirits to clean glue residue from the wood - just wipe it with a mineral spirits rag a few times and it will come off.

If you saved any of the bigger cut-out parts, place them back into the wood portrait to support it so it can be sanded.

If you used packing tape over the pattern, you can often get the pattern off in one piece after softening the glue - it makes a paper version of your portrait that might be usable if mounted on black cardstock.

Looking fwd to your posting of the final cutting.

EX-21 arrived 2-1-2013!
Porter-Cable PCB370SS in the corner
Lancaster Ohio
Ray Hayes - RMHayes@RMHayes.US
www.RMHayes.US


SMF

Teknoromi