Show Posts

This section allows you to view all posts made by this member. Note that you can only see posts made in areas you currently have access to.


Topics - EIEIO

Pages: 1 [2] 3 4 ... 11
16
Brag Forum / Praying Hands Rev.2 - to stack or resaw, that is the question
« on: September 04, 2014, 09:16:25 am »

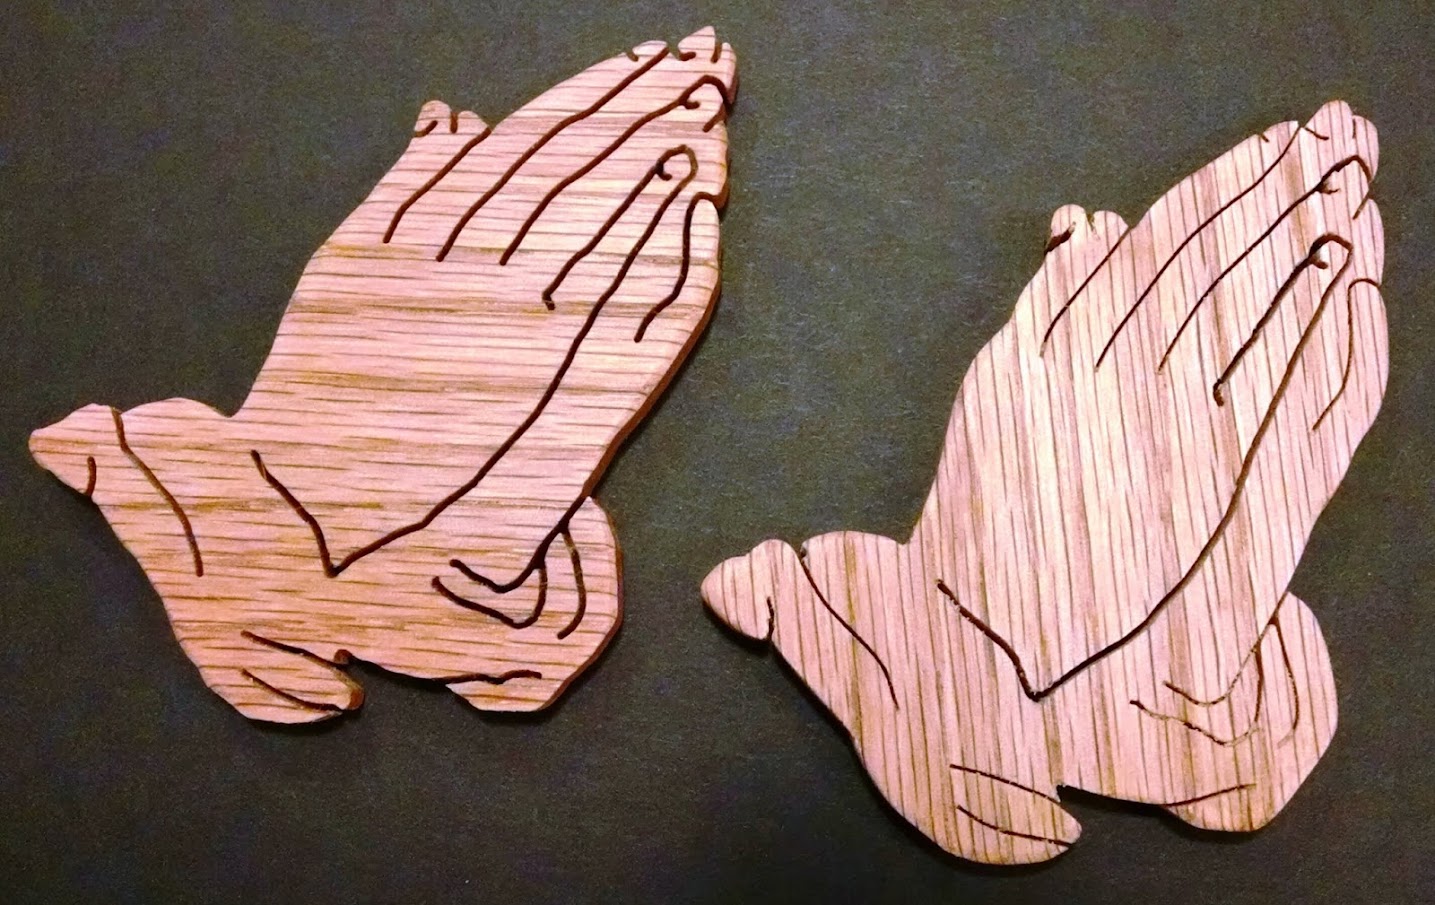
Praying Hands, 3.5" tall ornaments, 1/4" cherry.

Most people who commented on the last posting (including at home) preferred the thinner (FDUR#9) veining in these hands, and suggested orienting the grain to follow the fingers. But when I went out to the shop, I did not have enough 1/4" oak to make another set. I looked around and found a small piece of 1" thick cherry.

I was going to resaw the cherry to make the 1/4" blanks, but then realized I'd just be stacking the pieces together to cut the hands. Stacking this type of cut is a problem because cutting around the outside will cut the tape holding the stack together, so why not cut the hands first? With the pattern on the full 1" cherry, using the FDUR#9, I cut the pattern, then used the band saw to resaw the thick hand into 4 thin ornaments. The cherry burns easily, and after resaw these looked like hands that had been tarred-and-feathered. The belt sander took the surface back to flat, and a strip of stiff paper was used to clean the dust out of the veins.

I was happy with the results - the wood is beautiful, flat and hard, with a slight hint of grain. I may go back and try the oak with the grain oriented along the fingers, but these will do for now.

17
Brag Forum / Praying Hands Ornament
« on: September 03, 2014, 02:22:37 pm »

These are test cuts of small versions of Steve's Praying Hands for a customer order. They are 3.5" tall and cut in 1/4" red oak. The hands on the left are cut with a #5 new spiral (heavier lines). On the right, most cuts are FD-UR#9 except the pinky which is #5 new spiral. I may wind up turning the pattern to get the grain parallel to the fingers to minimize the chance of breakage.

18
General Scroll Saw Talk / Live edge slabs
« on: September 02, 2014, 12:19:16 pm »

These were cut 16 years ago by a local Amish teenager. I got them from a guy who bought them at the time and put them in his barn to dry. They are 3/4" thick cherry. The ruler on the right is 36" long so it gives a sense of their size. The surfaces are sawn - so they could be planed or sanded, or cut as they are. He has a bunch of them - he's been using them for sign making.

Any estimates a fair selling price?
Any ideas on how to package them for shipping? I was thinking of cutting a piece of 3/8" OSB and plastic wrap them, but I'm open to other suggestions.

19
Brag Forum / Black Walnut Baskets
« on: September 01, 2014, 09:48:44 am »

We live in an area with lots of Black Walnut. A guy down the road has a small sawmill and has been sawing local wood for years. These are from a 1x10 Black Walnut board that's been drying for 10 years. The heart wood/sap wood mix is really highlighted by the curved cuts in the rings. These baskets are 10" diameter and 5" tall (full 1" lumber), finished in 50/50 BLO and Mineral Spirits, then wiped down with Feed-N-Wax.
 

20
Brag Forum / Block Characters
« on: August 17, 2014, 10:31:35 am »

A client wanted 7"x7" plaques that looked like wooden blocks. These are cut from a 1x8 (0.75 x 7.25) clear pine board. Border and lettering were done in Inkscape to get the proportions right. The outlines of the borders and the letters are cut with a #12 blade at 6 degrees. This gives a relief of about 3/16". Then sanded to break the sharp edges and glued back together.

For anyone that's interested, the blade angle can be estimated by:
inverse sin of angle = kerf/relief.
For #12, kerf = 0.020. For a 0.25" relief, angle = asin(.020/.250) = 4.6 degrees.
For my cut, relief = 0.020/sin(6) = 0.191" (about 3/16).

21
Brag Forum / Butterfly Mod
« on: August 17, 2014, 10:23:40 am »

This is a mod to Steve's Shadow Butterfly, 3.5" tall. I'm not big on "Butterfly Kisses" but the technique to get the text to flow across an odd shape might be of use to someone.

I copied Steve's butterfly from the pdf, then pasted into Inkscape. Then I used the Bezier Curve tool to trace along the top edge of the left wing (click point to point then double-click the last point to complete the curve). Then use the Text tool to create the word "Butterfly" using 40 point Scroll Beach Italic. Go to the select tool (arrow at the top of the tool pallet), click the text, then shift-click the curve (so both are selected). Go to the top menu, Text/Put on Curve. This will make the word form across the top of the butterfly wing. Back in the text tool, set inter-character spacing (AA) so the word about stretches across the top of the wing. Then select the text and move it down so the top of the text is below the top of the wing. At this point the word is too wide, so use the arrows to squeeze the word smaller so it flows across the top edge of the wing as shown above. Repeat this for the word "Kisses" and the right wing edge. 

22
Pattern Requests. / Girl's Portrait - I can't find the original request!
« on: August 15, 2014, 04:12:47 pm »
Someone requested a pattern of a girl, and I made one but now can't find the original posting. Getting old is not for the timid.

Anyway, here it is. I hope someone can use it.

23
Brag Forum / Cherry Pipe
« on: August 07, 2014, 11:55:19 am »

This is a 6" long tobacco pipe compound cut from a 1" x 1.25" x 6" cherry blank. Instructions are in the pattern GIF.

This pipe draws very well and it is much lighter than a briar version, so easier to hold in your mouth.

After smoking a bowl I had a dry feeling in my mouth - I guess from the cherry wood mouthpiece. I ordered some commercial stems from PIMO http://www.pimopipecraft.com/index.html and will see how those work.

The compound cut pattern is attached.

24
Brag Forum / 30 Years
« on: July 16, 2014, 09:45:38 am »
A good friend will reach 30 years of sobriety in August - a great achievement. This is cut from a nicely figured 1" thick Cherry board. It is 8" tall. I skipped the base - the 1" thick is plenty to keep it standing upright, or it might be hung on a wall and the base would interfere.

Thanks Steve for this thoughtful pattern.

25
Brag Forum / Bottle Opener Modified
« on: July 09, 2014, 03:10:42 pm »
This is a variation on Steve's Bottle Opener. I liked Steve's idea but thought this would be easier to build. It's 2x3 inches, 3/4" thick, using a nickel rather than a penny. The penny bent on the 1st one I made. The nickel is epoxied into the opening. We'll have to see if that holds up. If not, I'll add a screw.
 

Pattern is attached.

26
The Coffee Shop / Happy July 4th
« on: July 04, 2014, 07:16:37 am »
I'm in Bangkok Thailand for a meeting and for the 1st time will not be home for the 4th of July. God bless the USA.

27
The Coffee Shop / Finally Legal
« on: June 27, 2014, 08:27:48 am »
I started work on my Private Pilot license in 2003. There were lots of excuses, but I had a bunch of starts, stops, plane changes, etc. I worked with 3 other guys and built a plane in the meantime. Yesterday I finally finished my Check Ride and got my Private Pilot License. Thanks to my beautiful bride for 11 years of patience and turning a blind eye to an expense that must seem hard to justify if you don't have the bug.

28
Brag Forum / Walnut Whistles
« on: June 16, 2014, 04:15:59 pm »

These are cut from 3/4" black walnut then finished with Howard's Butcher Block Conditioner. The plan is from Steve's source at http://jeplans.com/. The whistle plan is free after signing up. These sound very clean and are quite loud. The pitch is about 500 Hz (~B above middle C). I'd guess you could get different pitches by making them longer or shorter. These are 3" long. Easy to make - took longer for the glue to dry than to cut them.

29
Brag Forum / Open-end baguette board
« on: June 05, 2014, 04:44:07 pm »


This is a little different design - one end is open so you could slide your baguette out to cut some off? 24"x4" rock maple. Hard cutting wood, but it looks nice when it's done.

30
General Scroll Saw Talk / A New type of scroll saw blades?
« on: May 27, 2014, 04:20:08 pm »
In March, an add showed up on Steve's blog site from Bestway Products http://www.bestwayproductscompany.com/. They make bandsaw blades from a rolled wire with a sharp edge spiraling along the outside of the blade. I called them about bandsaw blades but they don't recommend use on small saws like my 14" Craftsman. I saw some scroll saw lengths available so I ordered some.

What I got was some blade sections 9" long, 0.040" diameter and 0.029" diameter. They look like a straight steel wire with a rolled edge that spirals around the wire and runs the full length of the blade (see 2nd photo below). I used heavy fencing  pliers to cut them to 5 1/8" long like the FDUR blades I have in stock (NOTE - I would NOT use good wire cutters to cut them to length - you would likely put a notch in your cutters). I mounted one in my EX-21 to try some cuts. The 1st picture below (hope this is OK Scala150 - your father's got an interesting looking face) is 4" tall 1/4" BB Ply, so a small portrait. The detail is not great but that was my choice in testing these spiral cut blades. I drilled 1/16" pilot holes. This was cut with the 0.040" blade.

The blade was very easy to use, allowing continuous motion in any direction. It did not wander or leave a lot of jitter in the cut. The feel was more like filing or chiseling. It left a clean top side, although  the bottom was pretty rough (there are no reverse teeth on these).

One thing - they held like iron in the blade clamps. The clamps have the rolled edge up into them, so there is an edge to hold on to. I don't know if this will cause any damage to the blade anvils, but I don't think it will.

2nd photo below is a shot of the blades. 3rd photo shows 0.040, 0.029, #1 spiral, FDUR#5, and a 2/0 blade cut in BB Ply.

Anyone who's had trouble controlling a spiral might want to give these a try. They seem very stable, easy to mount, stay clamped, and cut a nice top surface.


Pages: 1 [2] 3 4 ... 11

SMF

Teknoromi