Show Posts

This section allows you to view all posts made by this member. Note that you can only see posts made in areas you currently have access to.


Topics - Rapid Roger

Pages: 1 [2] 3 4
16
Tutorials, Techniques and Tips / Picture frame book part 2
« on: October 17, 2014, 09:41:01 pm »
Don't get too excited but, we are going to CUT THE BOOK IN HALF!  :o
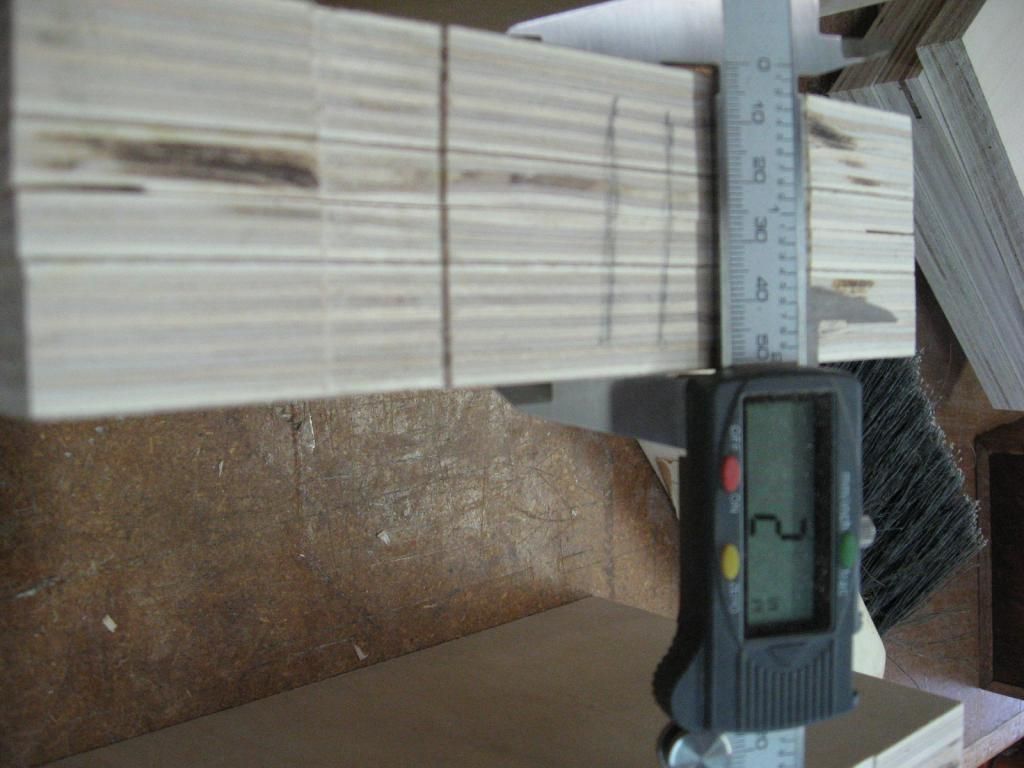
Carefully mark the exact center of the thickness of the three piece book all the way around the perimeter and saw it into two pieces using a table saw or hand saw. I had a thin kurf blade on the table saw which is 3/32" thick if you use a hand saw the kurf may vary but, it doesn't matter. A western style saw may make a thicker kurf and a Japanese saw will make a much thinner cut, but just make sure to stay exactly on the center line and make a nice smooth cut into the "butter" of our sandwich on all four sides and all will be well.
My sandwich started out to be 2-3/32" thick and after cutting it with the table saw it was only 2" thick. NO PROBLEM!


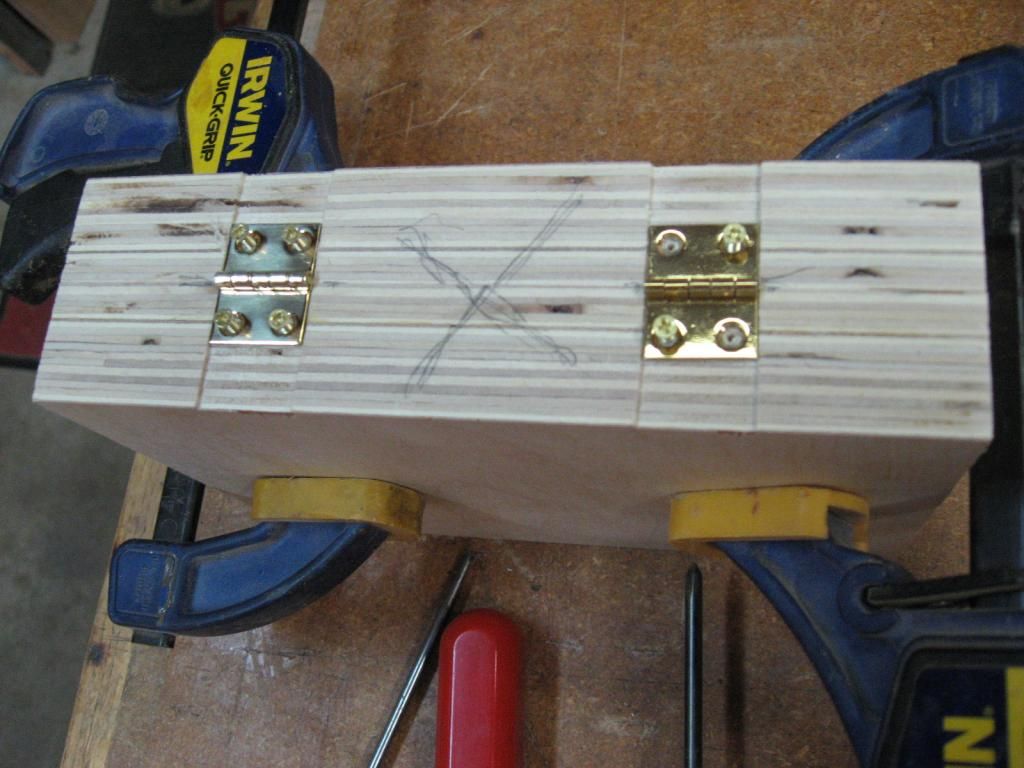
NOW we will install the hinges!
Lay the hinges in the notches and making very sure that the center of the barrel on the hinge is exactly in line with the cut we just made, Mark the hole locations and pre-drill small holes for the screws and install the hinges.
If you are concerned about the screws pulling out of the plywood edge, you may want to put a few drops of superglue or epoxy on the back of the hinge and maybe a drop on each screw for insurance. I did not glue the hinges because I don't think a picture frame will get too much abuse but, some people like the "belt AND suspenders" approach.  ;)


Now we should have a book that looks something like this...


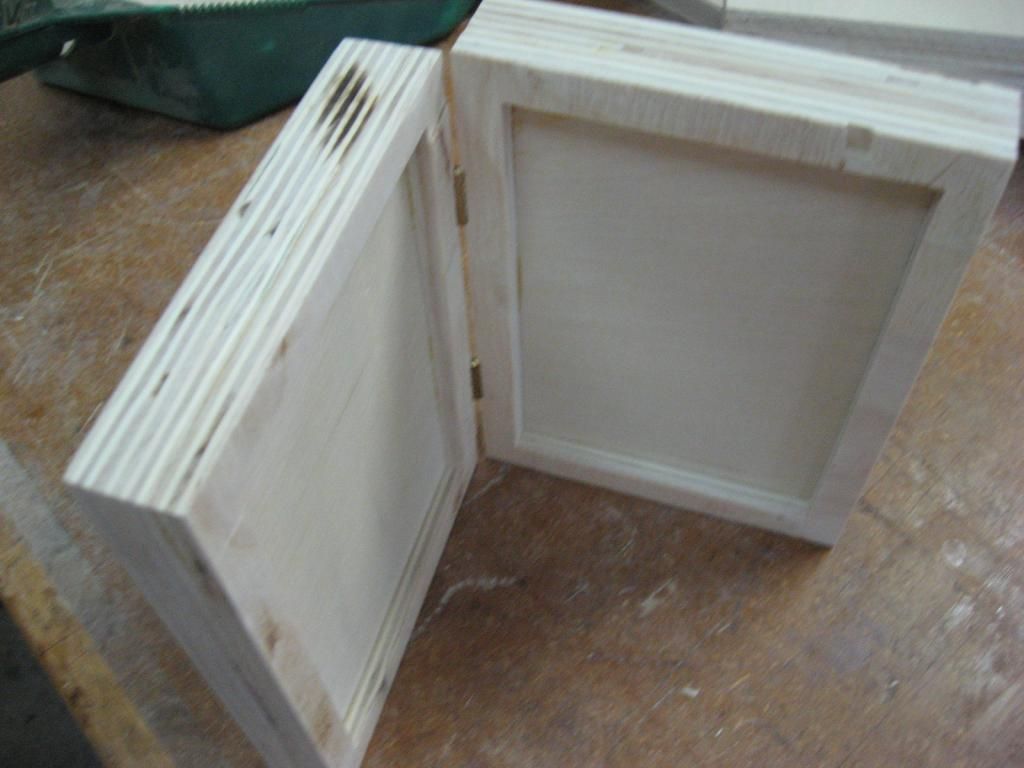
Next, we will make the frame.....

Rog


17
Tutorials, Techniques and Tips / Picture frame book part 1
« on: October 17, 2014, 09:05:20 pm »
OK! So third time a charm right... I'll do it in segments so maybe I won't loose it all at once.  ;)

Make the "book" out of 3/4" Baltic birch plywood.
Using  a table saw or hand saw, cut three pieces at least 1" larger in (width and length) than the size of the intended pictures.
My pictures were 4' x 6" so my plywood pieces  were cut 5" x 7". Yours can vary to what ever size you want. (even 8" x 10" photos which would make the book 9"+ x 11"+)
On one piece, cut the center out of it at least 1/32" to 1/16" larger than the intended photos by drilling holes and cutting it out with the scroll saw.


Glue the three pieces into a sandwich using the one with the cutout for the "butter" (center section)  ;)


Now cut notches  for the hinges using a router table (like I did) or the table saw or a chisel or the scroll saw.
JUST MAKE SURE that the notches are only as deep as the leaves of the hinges are thick. The barrel of the hinge should stand proud of the wood on the spine of the book. The number and size of the hinges is entirely up to you. I used two 3/4" x 1" hinges but, if your book is larger, you may want to go to larger hinges or even use three hinges.


DO NOT attach hinges yet!  Wait for part 2 for that.  ;D

Rog


18
Tutorials, Techniques and Tips / Mad!
« on: October 13, 2014, 12:06:00 pm »
I just spent an hour and a half making a tutorial on my book picture frames and LOST IT!!
Let me calm down a bit and I'll try to re post later.

Rog

19
Brag Forum / Tabletop picture frames
« on: October 11, 2014, 02:58:07 pm »
 We have some friends who are celebrating their 50th wedding anaversery and my wife wanted me to make them a gift. So we agreed on picture frames.
I made two frames in a "book" form using 3/4" plywood and some door skin material.and using small hinges to hold everything together.


Actually, I made four sets of "picture books" all at once so I have three more for Christmas gifts. Each one is a bit different as far as the book cover is concerned.
I also took a few construction photos as I went so, If anyone is interested, I can provide a tutorial if I get a request for it. Actually they are fairly simple so maybe you can make one just by looking a these photos.

Rog

PS The pictures in the frames are my wife and me not the gift couple. We have only been married for 46 years so far.  ;)
     The pictures can be changed out by removing the oak oval part of the frame.


20
Brag Forum / Segmented bowl using the scroll saw
« on: August 25, 2014, 12:00:18 pm »
I really like making bowls and vases on the scroll saw and I just finished this one yesterday.
It is segmented using three different woods...Cherry, Maple and Walnut... and I used a "new to me" technique that I get into down in the "Tutorial, Technique and Tips"  section of this forum if you care to see it.
Actually, this is my second try (I'll do anything twice) the reason is that I had another idea that didn't work on the first one. I'll  give that idea another try too later.  ;D


The wood thickness is 3/4" and the bowl measures 3" tall  and 8" in diameter.

Keep making saw dust and don't be afraid to try new ides for your self.

Rog

PS I posted a segmented vase about two years ago using yet another (more common) way of cutting the segments. Note that my "new way" doesn't show ANY end grain in the bowl.

21
Tutorials, Techniques and Tips / Tute on segmented bowl
« on: August 25, 2014, 11:36:25 am »
I thought of a new way to cut the segments for a segmented bowl and thought I would share it with you.
For starters, I'll warn you the a table saw with a very accurate miter gauge is REQUIRED and even then, some practice cuts are necessary. Fifteen degrees is not a real common angle for most of us but, in order to get 30 degrees for the segments it is a MUST!
Hope you enjoy my "new way" of getting started. I like it because it doesn't need much wood and wood is a problem for all of us.


http://s193.photobucket.com/user/rapidroger/library/Segmented%20bowl-NEW%20WAY


Actually, I ended up trashing the bowl that is used for the step by step photos.  ( I had an "IDEA" that didn't work  on this one) But, as I always say "I'll do anything twice!" so, the finished product is my second try at the procedure. (I intend to try my "IDEA" again too.  ;D )

Rog

22
Brag Forum / Barber shop
« on: June 19, 2014, 11:42:48 am »
Today's pattern from Steve Good and him telling about how much he liked his barber, brought to mind a project that I made about ten years ago.

I have been going to the same barber shop since 1970. It has been through several owners in that time but, it is close to my house and all the owners have been very nice guys and do a good job of keeping me looking fairly human so I keep returning.  :D
When I first got started in scrolling, I was making all kinds of things for everyone I knew and having a ball doing it.
One day before Christmas, I got to thinking about making something for the barber shop so, on my next "Trip for a trim" I started asking my barber a few casual questions about the history of the shop. He told me that it has always been known as "The Larkland  Barber Shop" and it has been open since the strip mall was built in 1956.
So, home I went with a possible pattern in mind and did a bit of sketching and cutting on the saw and came up with a Christmas gift for my favorite "Story Telling Place"  ;)   


These days, my son-in-law and grand son get their cuts at the same shop.  8) 
A nice presentable hair cut cost $10.00 these days.  ;D
The plaque still hangs on the wall near the cash register, saw it again just yesterday.  ;D

Rog

23
Tutorials, Techniques and Tips / 3D, puzzle, fish, key chains
« on: March 24, 2014, 10:52:37 am »
OK, I'm going to try to post a tutorial on how I make these "interesting" key chains.
I apologize for the pictures as some of them are not very clear but, they may help understand the process.
I had a pattern originally but, I found it easier just to draw directly on the wood and cut from there.
DON'T SAY "I CAN'T DRAW A STRAIGHT LINE." There are very few straight lines in them and besides every one of them will be a little different and that is the really cool part of them!   ;D 
You can use any hard wood you want to (that is another cool part) but, plywood is out of the question. Don't even try it! B. T. D. T. and got the T shirt.
I use both 1/2" and 3/4" thick wood but, almost any thickness will work. It is not a large piece of wood, I usually make them about 1" x 3" but again that is not important. Just don't make it too big or thick that it is clumsy for a pocket or purse.


Cut peg and drill eye hole so that it is a PRESS fit. This is important for holding the whole thing together. Draw two jigsaw puzzle shaped pieces on the top.


Cut the shape of the head from the front first and then the first puzzle piece from the top. Be sure to start the cut from the top BETWEEN the mouth and eye.


Now cut the second segment (which contains another puzzle shaped piece) from the front. Start this cut in an area that will trap the shape you cut from the top.


Cut the second puzzle shaped piece from the top. Again be sure to keep the side shape so that it traps the side piece.


Once that is done, you can assemble the whole thing and use the peg to keep it together to cut the remainder of the fishes body and tail.  Then while it is all together, go ahead and knock off the corners of the head from the top, slim down the area at the tail and start sanding


SAND, SAND AND SAND SOME MORE!  :D :D :D   Shape to suit yourself. Finish as you want to, it's your fish now!  ;)


I forgot to mention to drill a hole in the tail to incorporate the keychain but, I figured that ya'll could guess that.

I hope this helps and encourages you to try new and different things in your scrollsawing.


Upper left....Zebra wood.  Upper right....Cedar wood

Lower left ....Poplar wood.   Lower right ....Walnut 

And the ones I cut for this tutorial were cut from Cherry wood.

Rog


24
Brag Forum / An old project
« on: March 23, 2014, 03:49:42 pm »
I was cleaning up some remote areas of the shop the other day and came across some old 3D, puzzle keychains that I made several years ago.
Some of you oldtimers might remember these and maybe even have a pattern for them. After making two or three of them, I didn't even need a pattern, I just drew on the wood with a pencil to make them.
Anyway, it might be interesting to some of the newer members and challenge them a bit. :)


If there is an interest in them, I might post a tutorial on how to cut them in the proper section of the forum.

Rog

25
The Coffee Shop / I'm sorry.
« on: January 02, 2014, 06:44:15 pm »
  I just tried to log into this forum a few minutes ago and got a message that said "Rapid Roger you are banned from this site."
I don't know what I did but, I'm sorry.  :'(
I left and went to another forum and then came back and all is OK now. Guess I've been forgiven.
What kind of deal is this? Has anyone else experienced this problem?

Rog

26
Brag Forum / Boxes
« on: November 21, 2013, 05:08:26 pm »
Not a normal scroll sawing project I know but, this is the type of thing that I enjoy making.
They are boxes for Christmas gifts for my grandchildren. I cut all five boxes out of one large board that measured 3-1/2" x 5" x 45" long. Granted, most of the initial work was done on the table saw but, I cut the centers out with the scroll saw and of course the inlayed names on the tops were cut on the scroll saw as well as the bevels for the sliding dovetails on the lids.
I pretty much left the rough finish of the original board in tact on purpose  and use some cherry scraps for the letters for contrast.
Hope you enjoy something different from time to time. Feel free to ask any questions you might have.
I took step by step photos which of course as you know, "A picture is worth a thousand words".  :)


Rog


27
Brag Forum / Finished a project
« on: October 30, 2013, 06:59:22 pm »
I just finished a project and thought I would "brag" a little.
I also posted a picture tutorial of how I made it in the "Tutorial Section" if you are interested in seeing it. Am willing to answer any questions you might have about how it was made.

Segmented Vase....


Rog
 

28
Tutorials, Techniques and Tips / Segmented vase construction
« on: October 30, 2013, 06:51:51 pm »
Going to try to load a tute on how I made a segmented vase. I hope it works.  ;)

This is NOT necessarily the right way to do it, it is just my way. I have another idea to try and see if it can be done any easier.
This is a picture tute and not really a lot of description so if you have questions feel free to ask and I'll try to give you an answer.

http://s193.photobucket.com/user/rapidroger/library/Segmented%20Vase%20Construction


 Does this work?

Rog

29
The Coffee Shop / Voices
« on: October 29, 2013, 12:17:39 pm »
I know that the voices in my head aren't real but, they sure come up with some great ideas!  ;D

Rog

30
Brag Forum / I'm so glad to see...
« on: July 14, 2013, 10:57:53 am »
I'm so glad to see all of the different projects done on the scroll saw these days.
Fretwork has it's place and I enjoy seeing the work that people have done but, here lately people have been coming up with other ideas and uses for the saw that we all enjoy using and I must say that I LOVE the way things are going.
I always enjoy coming up with new ideas in my woodworking and uses and ways of using the tools and wood in different ways.
Here is my latest (first try) and I hope that it encourages people to step out of the comfort zone (the RUT as far as I'm concerned) and try new and different projects.


Yes, the shape was cut on my scroll saw and there was A LOT of sanding done. (almost as much as a bowl or vase  ;D) The wood is 1-1/4" thick cedar and measures 12-1/2" x 18". I did have to use the router and drill to  cut the holes for the electronics and a few hand tools as well. Still some re-assembly to be done when I get the finish completed to make it a usable instrument again.  ;)

Rog

Pages: 1 [2] 3 4

SMF

Teknoromi